Filtering
Frequently during your work as an advocate, you will be asked for very specific information regarding different topics related to your dependent. Your annual report to the Court, for example, will ask you “How much was spent on insurance in a year?” or “How much social security income did your dependent receive?”. Manually computing this information can be tedious and prone to mathematical errors.
Advocord does the work for you. Using Advocord’s filtering feature within the Activity Log, Income, and Expense sections of the platform will give you the ability to customize and tailor reports to respond to any request for information from anywhere.
Activity Log Filtering
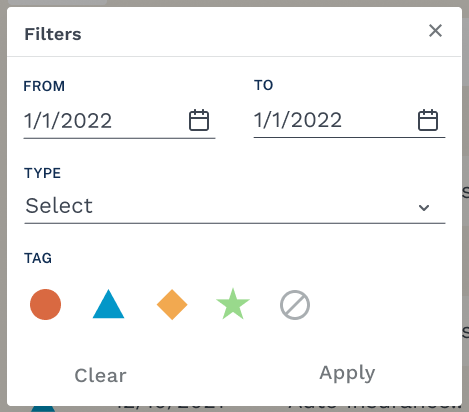
Click on the “Filter” button in the Activity Log, a box will open that allows you to select several ways to filter the information you have entered. For instance, you can filter activities by date. So, if you want to know all the activities that occurred during a specific date range, you can enter those dates, click “Apply”, and you will be shown only those activities that occurred during your chosen time frame.
If you wish to filter by the type of activity, select the drop-down menu in the filter box, and select which type of activities you wish to see.
You can also use the “Filter” button to only see activities that you have categorized by using the different icons. For example, if you use the red circle for medical appointments, then you can create a list and report of only medical appointments by selecting the red circle in the Filter box. You can select more than one icon if you wish to see more than one category in your filtered list.
You can filter by any single or multiple criteria. That way, you can create a list of only those medical appointments that occurred within the past three months, for example, by utilizing both the date and icon filters.
Once you have selected at least one of the ways to filter your data, “Apply” will become active. Click the “Apply” button, to see the specific list of information that you have requested. That list can be downloaded and shared as a report. “Clear” will clear the filter values so that your filters will be cleared, and you will see the complete list of all data you have entered.
Income Filtering
Click on the “Filter” button in the Income section of the platform, a box will open that allows you to select several ways to filter the information you have entered. For instance, you can filter income by date. So, if you want to know all the income that was received during a specific date range, you can enter those dates, click “Apply”, and you will be shown only the income that was received during your chosen time frame.
If you only want information on a specific type of income, you will select from the drop-down menu under “income type” and select one or more types of income sources to view.
If you only want information on a specific source or sources of income, you will enter the name or names of the sources on the “Source” line in the filter box.
You can filter by any single or multiple criteria. That way, you can create a list of only social security and rental income that was received within the past three months, for example, by utilizing both the date and source filters.
Once you have selected at least one of the ways to filter your data, “Apply” will become active. By clicking the “Apply” button, you will see the specific list of information that you have requested. That list can be downloaded and shared as a report. “Clear” will clear the filter values so that your filters will be cleared, and you will see the complete list of all data you have entered.
Expense Filtering
Click on the “Filter” button in the Expense section of the platform, a box will open that allows you to select several ways to filter the information you have entered. For instance, you can filter expenses by date. So, if you want to know all the expenses that were paid during a specific date range, you can enter those dates, click “Apply”, and you will be shown only the expenses that were received during your chosen time frame.
If you only want information on a specific type of expense, you will select from the drop-down menu under “expense type” and select one or more types of expenses to view.
If you only want information on a specific payee of an expense, you will enter the name or names of the payee on the “Paid To” line in the filter box.
You can filter by any single or multiple criteria. That way, you can create a list of only utility and medical expenses that were paid within the past three months, for example, by utilizing both the date and expense type filters.
Once you have selected at least one of the ways to filter your data, “Apply” will become active. By clicking the “Apply” button, you will see the specific list of information that you have requested. That list can be downloaded and shared as a report. “Clear” will clear the filter values so that your filters will be cleared, and you will see the complete list of all data you have entered.